Creating Custom Dashboards
The top page of your SegMetrics account your default analytics dashboard, with access to your latest leads, revenue, lead value, top products and more. And while the default Dashboard may be enough for some people, SegMetrics gives you the power to easily create and customize your own dashboards.

You can create multiple dashboards to organize your reporting data, and each dashboard can contain multiple widgets, based on the saved reports you've already made, to give you an overview of the KPIs that matter most for your business.
Create a Dashboard
- Click on Dashboards in the left hand navigation menu
- Click Add Dashboard in the sub-menu at the top of the screen
- Choose to build your dashboard from a Template, or from scratch
- Click Save Dashboard
Types of Widgets
A dashboard can have one or more of the following kinds of widgets:
- Single Value - A single KPI value from the report that the widget is based on
- Snapshot - A sparkline and single KPI value from the report that the widget is based on. This is the same as the snapshot from the Saved Reports menu item.
- Timeline - A graph detailing the change in a single KPI over time
- Table - Displays up to two KPIs from the report that the widget is based on. Can be set to show the top 5 or 10 rows.
- Custom HTML - This is a special type of widget that allows you to input custom HTML into the dashboard. This is useful for embedding reports from other systems into SegMetrics.
Add a Widget to your Dashboard
- Select the Dashboard that you want to add the Widget to, from the dropdown menu
- Click Add Widget and choose either a Report or Custom HTML widget.
- Give the Widget a name
- Choose the Display Type from the list above
- Choose the Base Report that the data will be based off of. This will define what filters and KPIs are available for the Widget
- Choose the KPI Value that you would like to display on the widget
- Set any Advanced Settings (Optional, see below)
- Click Save Widget
Widget Advanced Settings
By default Widgets take on the properties of report that they're based on, and show data in a 30-day rolling report. You can add additional options and settings by turning on the widget's Advanced Settings.
- When creating a new widget, or editing an existing widget, click the Show Advanced Settings option.
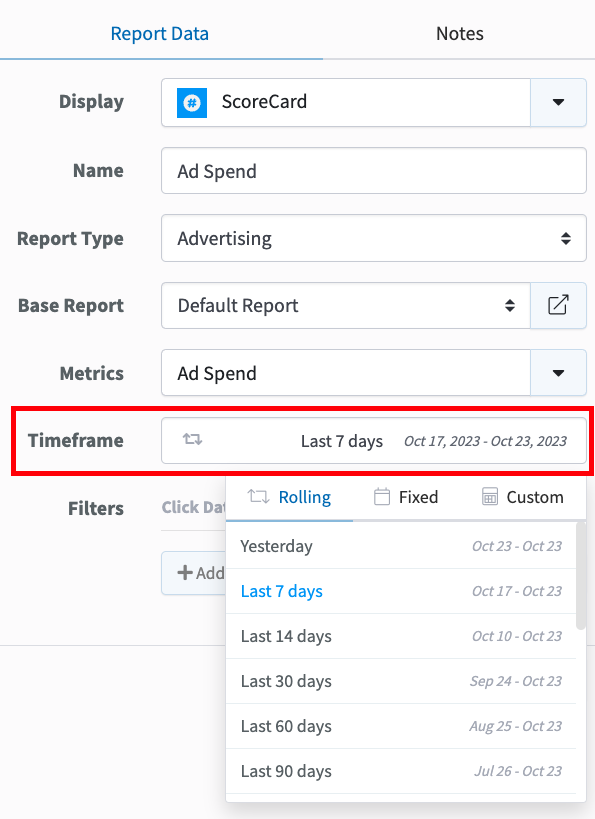
- Choose the timespan of the report. You can change from a rolling report to a fixed timeframe by clicking the Timespan icon
- Set any additional filters you would like to add to the widget. These will be added to the existing filters on the report, and are a great way to create multiple custom widgets from a single base report.
Edit, Delete or Clone a Widget
To modify an existing widget, hover over the widget then click the Pencil icon.
To delete an existing widget, open the edit window by hovering over the widget then click the Pencil icon. Then click Delete Widget at the bottom of the window.
Edit, Delete or Clone a Dashboard
To modify an existing dashboard, click Save from the main menu, and choose Edit.
To clone an existing dashboard, along with all its' widgets click Save from the main menu, and choose Duplicate.
To delete an existing dashboard, click Save from the main menu, and choose Delete.
Modify the Date Range of Dashboard
There are two ways to modify the dashboard widget date ranges. You can update the entire dashboard globally, or you have the option to modify each individual widget date range.
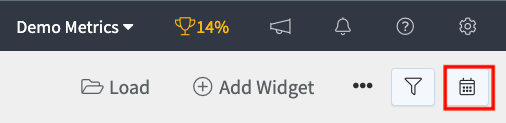
Global date range update:
To update all of the dashboard widgets globally:
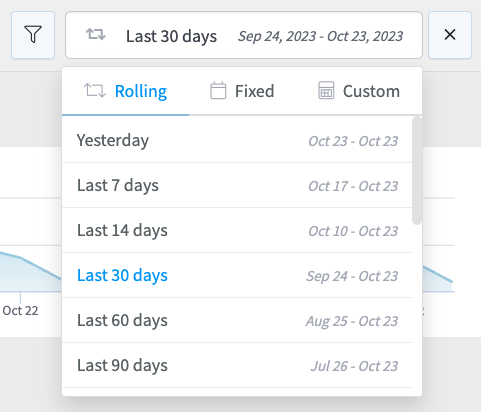
Click the calendar icon at the top right of the dashboard screen.
Use the date range selector to choose the preferred range.
Note: When updating the date range in this way, ALL of the dashboard widget will conform to the selected date range, even if they were previously set differently.
To cancel out the global date range and go back to each widget having different ranges, click the “X” icon next to the global date range selector.

Individual widget date range update
To modify the date range for each individual widget:
- Navigate to the widget you’d like to modify.
- Double click the widget to open up the editor.
Use the date range selector to select your preferred range.
- Click Save.