Calendly
To properly track user booking a call connecting Calendly to SegMetrics is optional. Properly configuring Calendly is not. This integration guide provides enhanced tracking setup for embedded forms or direct Calendly links where automatic tracking may not work.
Step 1: Install SegMetrics Tracking
Ensure the SegMetrics tracking pixel is installed on your website:
- In SegMetrics, navigate to Site Setup from the gear menu
- Copy the tracking pixel code
- Install it on your website following the Installing the Tracking Pixel guide
- Create a thank you page on your site for Calendly booking confirmations
Note: If you are sending a user to a calendly page where a SegMetrics pixel is not installed, we will not be able to track where that user came from. To get aroudn this, you can embedd a Calendly signup on your own site where you can put the SegMetrics pixel.
Step 2: Configure Calendly Event
Set up your Calendly event to redirect to your tracking page:
- In Calendly, click on the event you want to track
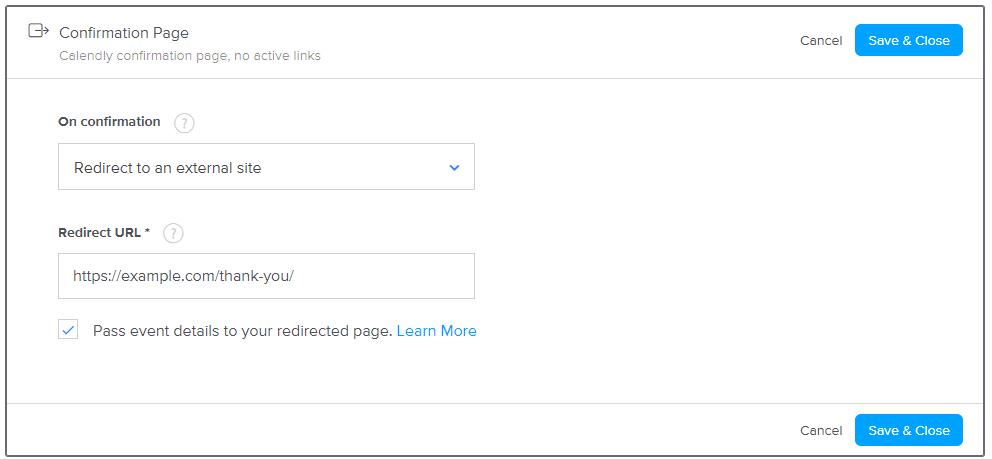
- Click Confirmation Page
- Set On Confirmation to "Redirect to an external site"
- Enter your thank you page URL
- Check the box for "Pass event details to your redirected page"
- Click Save & Close

Step 3: Add Tracking Code
Add the following JavaScript to your thank you page footer to capture the email from Calendly's URL parameters:
<script>
setTimeout(function(){
    _segq.push(['optin', {email: SegMet.queryVal('invitee_email') }]);
}, 1000);
</script>
This code extracts the email address from the URL parameters that Calendly passes to your redirect page.
Understanding the Data Flow
When someone books a Calendly appointment, the system redirects them to your thank you page with booking data in the URL:
Example URL:
https://example.com/thank-you?assigned_to=awesome&event_type_uuid=AAAAABBBBCCCCC&event_type_name=Awesome%20Sauce&event_start_time=2020-06-26T15%3A00%3A00%2B10%3A00&event_end_time=2020-06-26T15%3A30%3A00%2B10%3A00&invitee_uuid=BBBBBBBBBBBB&invitee_full_name=Luke&invitee_email=test%40gmail.com
The tracking code extracts the invitee_email parameter and sends it to SegMetrics for lead tracking.
Testing Your Integration
- Book a test appointment through your Calendly link
- Confirm you're redirected to your thank you page
- Check that the URL contains booking parameters
- Verify the lead appears in SegMetrics within a few minutes
- Look for the contact in your SegMetrics dashboard under the appropriate campaign or source
Frequently Asked Questions
Q: Does SegMetrics automatically track Calendly bookings?
A: No, SegMetrics requires proper configuration to track Calendly leads. You must set up Calendly to redirect to a thank you page with the SegMetrics tracking pixel and add the tracking code shown in this guide.
Q: What if I don't set up this redirect configuration?
A: Without the redirect setup, SegMetrics won't track your Calendly leads. The tracking pixel needs to be on a page that receives the booking data from Calendly to capture contact information.
Q: Can I track Calendly leads on the Calendly-hosted confirmation page?
A: No, you cannot install the SegMetrics tracking pixel on Calendly's hosted pages. You must redirect to your own thank you page where you can install the tracking code.
Q: What if my thank you page doesn't receive the URL parameters?
A: Ensure you've checked "Pass event details to your redirected page" in your Calendly event settings. Without this option enabled, the booking data won't be passed to your redirect page.
Q: How quickly do leads appear in SegMetrics after booking?
A: Leads typically appear in SegMetrics within a few minutes of booking. The 1-second delay in the tracking code ensures the page fully loads before sending the data.