Shopify
SegMetrics offers direct integration with Shopify to track revenue, refunds, coupons, and customer journeys. This comprehensive integration combines order data import with web tracking to provide complete attribution analysis from first touch to purchase and beyond.
Note: This integration does not provide tag dates. SegMetrics will record the date a tag was first seen rather than the date it was originally applied.
Watch this video for a walk through on how to connect your Shopify account to SegMetrics or read below for a step by step.
Integration Overview
The Shopify integration provides two complementary tracking capabilities:
- Revenue Integration: Direct API connection imports all order data, customer information, refunds, and transaction details
- Web Tracking: Tracking pixel captures visitor behavior, traffic sources, and attribution data
When combined, these create complete customer journey visibility from initial website visit through purchase and beyond.
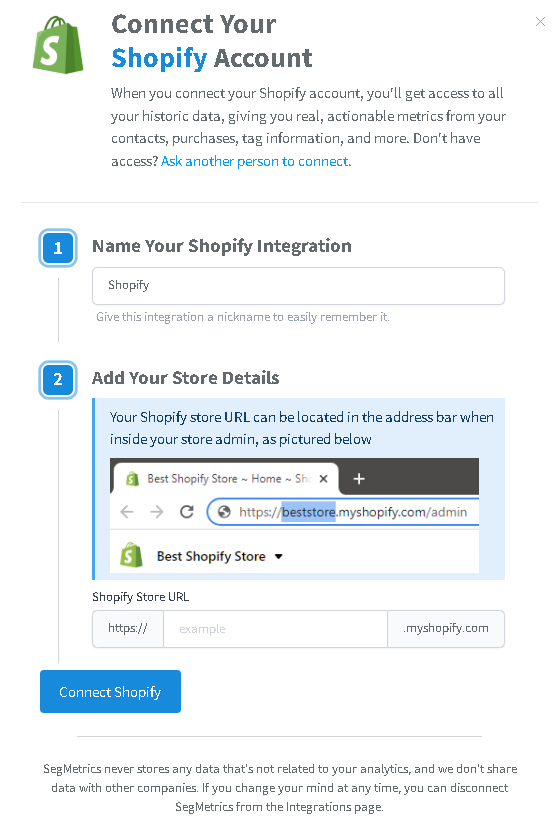
Step 1: Connect Shopify Integration
Set up the direct API connection to import order data:
-
Navigate to the Shopify integration page in SegMetrics
Enter your Shopify store details:
- Store Name: Use the original name you gave your Shopify store when first created
- Store URL: Your complete Shopify store domain
- Click Connect Shopify to authorize the integration
- Complete the OAuth authorization process
Important: If you use a custom domain, your store name is still the original Shopify store name from account creation, not your custom domain.
Once connected, SegMetrics will automatically import all historical Shopify data including orders, customers, products, and transaction history.
Step 2: Install Web Tracking on Your Shop
Add the SegMetrics tracking pixel to capture visitor behavior and enable attribution:
Get Your Tracking Code
- In SegMetrics, navigate to Site Setup from the gear menu
- Copy your tracking pixel code
Install the SegMetrics Tracking Code on Your Shop
- In your Shopify admin, click Online store, and then click Themes
- In the theme drop-down, click Edit Code
- Copy the Tracking Code pixel from SegMetrics
- In your Shopify admin, open your
theme.liquidfile - Paste the code pixel as low in the
<head>of thetheme.liquidcode as possible - In your Shopify admin, click Save
Step 3: Install the Checkout Code
Configure checkout tracking to ensure accurate attribution of purchases to marketing campaigns:
- From your Shopify admin, go to Settings > Customer Events
- Click Add custom pixel in the top right
- Name your pixel SegMetrics and click Add pixel
- Clear the contents of the Code field and copy/paste the following code exactly. This field should not contain any HTML, unlike the pixel code installed in your Liquid theme:
document.addEventListener('segtrk.ready', function(e) {
  SegMet.Integrations.shopify(analytics);
});
var _segq = _segq || [];
var _segs = _segs || {};
(function () {var dc = document.createElement('script');dc.type = 'text/javascript';dc.async = true;dc.src = '//tag.segmetrics.io/aEayDn.js';var s = document.getElementsByTagName('script')[0];s.parentNode.insertBefore(dc,s);})();
- Save your code
- Click Connect
- Confirm this action by pressing Connect again
How to Use Shopify Data in SegMetrics
Report Types Available
- Acquisition Reports - NEW customers only
- Nurture Reports - Customers who received tags/list additions
- Engagement Reports - Customers who interacted with website
- Orders Reports - ALL revenue regardless of customer status
- Subscriptions Reports - Customers who started subscriptions
Key Benefits
- Complete Attribution: Track customer journeys from first website visit through purchase
- Revenue Analysis: Analyze performance by product, collection, discount codes, and customer segments
- Refund Tracking: Monitor returns and their impact on campaign ROI
- Cross-Platform Integration: Combine Shopify data with email marketing, ads, and CRM data
- Lifetime Value: Track customer value over time including repeat purchases
Understanding Refund Reporting
SegMetrics and Shopify handle refund reporting differently, which may cause apparent discrepancies:
Shopify Refund Definition: Total returns processed during the selected time period, regardless of when the original purchase occurred.
SegMetrics Refund Definition: Refunds are attributed back to the original order date, not the refund processing date.
Example Scenario:
- Order placed: January 15
- Refund processed: February 10
- February report in Shopify: Shows the refund
- February report in SegMetrics: Does not show the refund (attributed to January)
To view refunds in SegMetrics:
- Go to Orders Report
- Add Order Status filter
- Set filter to "has been refunded"
- Ensure your date range includes the original order dates
[Image placeholder: Screenshot of SegMetrics Orders Report showing Order Status filter set to "has been refunded" with sample refund data]
Frequently Asked Questions
Q: Does the integration import historical data?
A: Yes, when you first connect Shopify, SegMetrics automatically imports all historical order data, customers, and transaction details.
Q: How quickly do new orders appear in SegMetrics?
A: New orders typically appear during the next import cycle. Pending on your plan it could be anywhere from 6-10 hours of being placed in Shopify through the real-time API connection.
Q: Do I need to install tracking on both my theme and checkout?
A: Yes, both installations are required. The theme tracking captures website visitor behavior, while the checkout code ensures proper attribution of purchases to marketing campaigns.
Q: What about subscription products and recurring orders?
A: The integration captures all subscription orders and recurring payments. SegMetrics categorizes these appropriately in the Subscriptions reports.
Q: Do I need different setup for multiple Shopify stores?
A: Yes, each Shopify store requires its own integration setup in SegMetrics. You can connect multiple stores to the same SegMetrics account.
Q: What happens if I change my Shopify theme?
A: You'll need to reinstall the tracking pixel in your new theme's theme.liquid file. The Customer Events pixel will remain active across theme changes.
Transcription:
Ready to see exactly where your Shopify customers are coming from and which marketing channels are driving revenue. Let's connect your Shopify Store to SegMetrics.
There are two parts to connecting the integration and installing your tracking pixels.
This will take a few minutes, but I'll walk you through every step from your SegMetris account.
Start by clicking the Gear icon, then open up your Integrations.
Find the Shopify integration and click on it.
You'll be asked for your Shopify Store URL.
Your Shopify Store URL can be located in the address bar when inside your store admin, enter that in and click Connect.
Shopify will open and ask you to install the SegMetrics app.
Click Install to confirm.
Once connected, SegMetrics will automatically pull in your historical Shopify data, your orders, products, coupon codes, and more. That import runs in the background, so let's keep moving and get your tracking pixels installed.
Now head over to your site setup page and click View Your Setup Instructions.
You'll see your SegMetrics tracking pixel.
Go ahead and copy that.
Jump back over to your Shopify admin and click Online Store.
In the left sidebar, click the three dots next to your active theme and select Edit Code.
Don't worry, we're just going to make one small addition here.
Under the Layout folder, open the file called theme.liquid.
Now search for the closing Head tag. It looks like this.
Paste your SegMetrics tracking pixel directly above that tag.
Then click Save.
Great.
Now head back over to your SegMetrics setup instructions.
This time, scroll down to the Shopify section and copy the second tracking pixel.
This one is specifically for tracking your checkout page, so it's important to install both.
Head back over to your Shopify admin home screen and click Settings.
In the lower left corner, navigate to the customer events, then click More Views and select Custom Pixels.
Click Add Custom Pixel and name it SegMetrics so it's easy to find later.
Paste your tracking pixel into the code area, click Save, and then click Connect.
And that's it. You're all set.
SegMetrics is now tracking your Shopify visitors, leads and orders end to end.
Give it a little time for data to come in, and you'll start seeing exactly which marketing channels are bringing in your most valuable customers.