Outbrain
When tracking Outbrain ads with SegMetrics, you need to configure your campaigns with the appropriate tracking parameters to monitor ad performance and calculate return on ad spend (ROAS).
Setting Up Outbrain Ad Tracking
To track your Outbrain campaigns effectively in SegMetrics, you need to add specific tracking parameters to your ads.
Step 1: Install the SegMetrics tracking pixel Make sure the SegMetrics tracking pixel is installed on your website and landing pages.
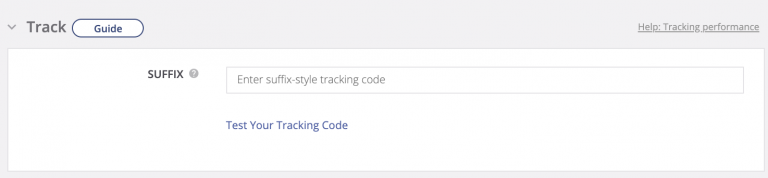
Step 2: Add tracking parameters to your campaign In your Outbrain campaign settings, navigate to the Tracking section and add the following parameter in the Suffix field:
ad_id={{ad_id}}
This parameter is essential for SegMetrics to track your ad spend effectively. For detailed instructions, refer to Outbrain's UTM tracking documentation.
Configuring UTM Parameters
For comprehensive tracking that includes both ad spend and UTM data, use this complete parameter string in your campaign's Tracking section:
utm_campaign={{campaign_name}}&utm_source=outbrain&utm_medium=cpc&utm_content={{ad_title}}&utm_term={{publisher_name}}_{{section_name}}&ad_id={{ad_id}}
Setting up UTM tracking:
-
When creating a new Outbrain ad, ensure your Destination URL includes the tracking parameters
Example:
https://example.com/?ad_id={{ad_id}} - Add UTM parameters in the Tracking section of your campaign settings, not in the content URL itself
- Your tracking code can be modified at any time during campaign creation or after submission by clicking the pencil icon to open campaign settings
Important: When submitting a URL as content, do NOT add UTM parameters to the URL field. Always add tracking parameters in the dedicated Tracking section.
Importing Ad Spend Data via Zapier
While SegMetrics can track campaign performance through UTM parameters, importing actual ad spend data provides complete ROAS calculations.
Overview
Basic ad tracking through UTM parameters provides sufficient data for 90% of Outbrain advertisers to optimize their campaigns. However, to calculate precise return on ad spend (ROAS), you'll need to import actual spending data from Outbrain.
Setting Up Zapier Integration
Step 1: Export ad spend data from Outbrain
- From your Outbrain dashboard, click By Ad in the navigation
- Click Export from the menu
- Your report will download immediately
Step 2: Create a Google Sheet
- In Google Drive, click New > Google Sheets
- Name the spreadsheet "SegMetrics <> Outbrain Ad Spend"
- Rename the default sheet tab from "Sheet 1" to "Ad Spend"
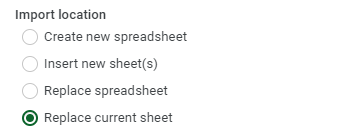
- Go to File > Import and upload your Outbrain data file
- Choose "Replace Current Sheet" for the import location
- Click Import Data
Step 3: Configure Zapier automation
You can either use our pre-built Zapier template or set up manually by following Zapier's Google Sheets integration instructions:
- Create a new Zap in Zapier using Google Sheets as the trigger
- Set it to trigger when a new row is added with the Ad ID column populated
- Follow the SegMetrics Zapier integration guide to configure the Custom Ads connection
- Map the Google Sheet data to SegMetrics using "Record Ad Performance"
- Test the integration and activate your Zap
Troubleshooting
URL Shorteners Remove Tracking
Most URL shorteners will strip UTM parameters and ad tracking from your final URLs, which breaks tracking in SegMetrics and other analytics platforms.
Test your URL shortener: Add ?utm_campaign=test to your shortened URL and check if the parameter survives the redirect.
Examples:
- ✅ Good:
https://segmetrics.io?utm_campaign=test - ❌ Bad:
https://segmetrics.io(parameters removed)
Solution: Use your full destination URL in Outbrain campaigns, or use a custom redirect service that preserves UTM parameters.
Dynamic Parameters Not Working
Ensure you're using the correct Outbrain macro format with double curly braces: {{parameter_name}}
Supported Outbrain macros:
{{ad_id}}- Unique ad identifier{{campaign_name}}- Campaign name{{ad_title}}- Ad headline text{{publisher_name}}- Publisher site name{{section_name}}- Publisher section
Tracking Discrepancies
If you see discrepancies between Outbrain and SegMetrics data:
- Verify UTM parameters are added at campaign level, not URL level
- Check that SegMetrics tracking pixel is properly installed on all landing pages
- Ensure tracking codes are placed in the page header, not footer
- Account for mobile page load times (pages loading over 4 seconds see 25%+ drop-off)
Frequently Asked Questions
Q: Why should I use both UTM tracking and the Zapier integration?
A: UTM tracking shows campaign performance and user behavior, while the Zapier integration imports actual ad spend data for precise ROAS calculations. Combined, they provide complete campaign analysis.
Q: Can I track Outbrain campaigns without connecting Zapier?
A: Yes, UTM tracking alone provides comprehensive performance data for most advertisers. Zapier is only needed if you want to import actual spend data for ROAS calculations.
Q: What happens if I change my campaign name in Outbrain?
A: If you use {{campaign_name}} in your UTM parameters, the tracking will automatically update. For more stable tracking, consider using {{campaign_id}} which never changes.
Q: Do I need to add tracking parameters to each ad individually?
A: No, add UTM parameters at the campaign level in the Tracking section. Outbrain will automatically append them to all URLs in that campaign.
Q: Why aren't my campaigns showing up in SegMetrics?
A: Ensure the SegMetrics tracking pixel is installed on your landing pages and that you've added the required ad_id={{ad_id}} parameter to your campaign tracking settings.