
LeadsHook
Connect LeadsHook to SegMetrics to track every lead who completes your quiz, attribute them to the correct ad click or traffic source, and see their full journey in your SegMetrics account.
Before You Begin
Make sure you have:
- Your SegMetrics tracking pixel code (found under Site Setup)
- Access to edit your LeadsHook decision tree
- The email field already present and working in your LeadsHook flow
Step 1 — Install the SegMetrics Pixel
- In SegMetrics, click the gear icon and go to Site Setup.
- Copy the tracking pixel code.
- In LeadsHook, open your decision tree and go to Settings → Head Script.
- Paste the SegMetrics pixel into the head script field.
- Save your changes.
Note: Adding the pixel here applies it to every page of your quiz automatically.
Step 2 — Capture the SegMetrics Visitor UID
SegMetrics assigns every visitor a unique ID when they land on your page. You need to save this ID inside LeadsHook so it can be passed along when the lead is identified.
- In your decision tree, open the name node (or your first interaction node).
- Add a node-level script and paste the following:
setTimeout(function() {
DT.setField("segUID", segmet.visitor.uid);
}, 1000);
- Create a Custom Field in LeadsHook named segUID.

- Save the node.
Note: The 1-second delay ensures the SegMetrics script has fully loaded before the UID is read. Place this script on an early node — before the email is collected.
Step 3 — Add the Identify Node
After the email node in your decision tree, add an API / Webhook node to send the lead's email and UID to SegMetrics.
- Add a new API / Webhook node immediately after your email collection node.
- Set the Method to GET.
-
Set the Request URL to:
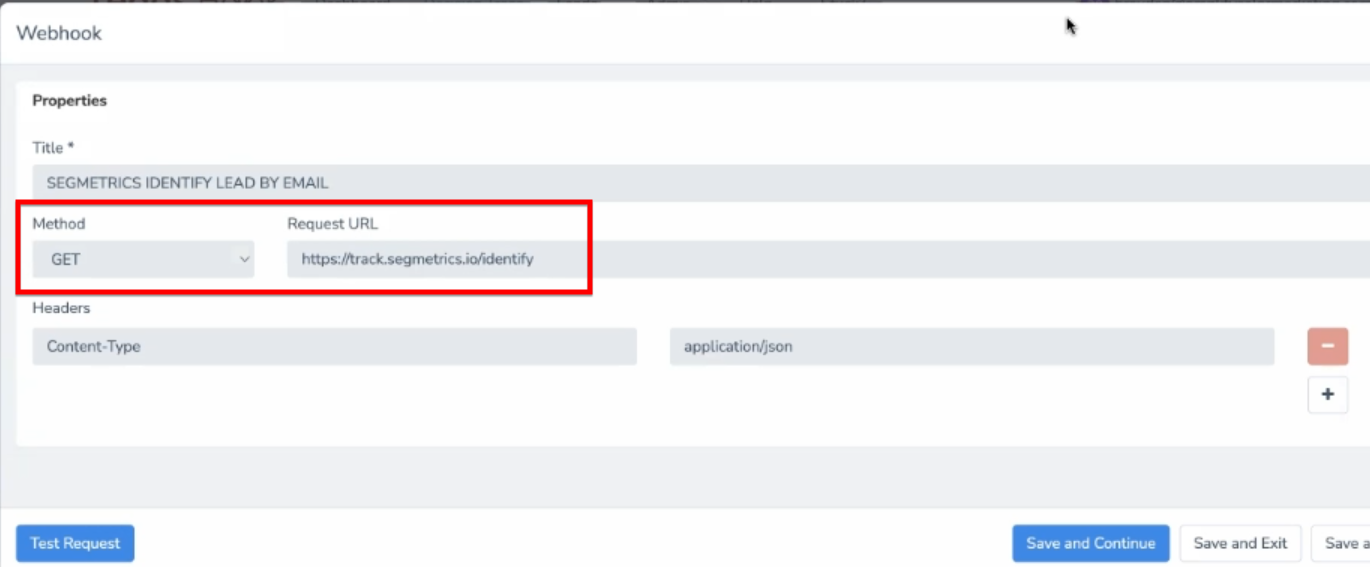
https://track.segmetrics.io/identify?account_id=YOUR_ACCOUNT_ID&email={email}&uid={segUID}
Replace YOUR_ACCOUNT_ID with your account ID from SegMetrics Site Setup. Map {email} and {segUID} to the corresponding LeadsHook fields.
- Save the node.
Step 4 — Publish and Test
- Publish your decision tree to push all changes live.
- Open your quiz in an incognito window and complete it with a test email (e.g., test@example.com).
- Let the data get processed (happens every 8 hours) and Confirm the contact appears with a visitor UID and (if running ads with UTMs) the correct attribution source.
Note: If the contact does not appear, confirm the pixel is in the Head Script and that the segUID field name in the script matches the field name in the identify node URL exactly.
FAQ
Q. Do I need to add the pixel to every node in my quiz?
A. No. Adding it once to the Head Script in Settings applies it across all pages automatically.
Q. What if the UID is empty when the identify call fires?
A. Increase the setTimeout delay from 1000 to 2000 (2 seconds) and re-test. Also confirm the pixel is correctly installed in the Head Script.
Q. Will this work if my quiz is embedded in an iframe?
A. For best results, link directly to your LeadsHook quiz URL rather than embedding it in an iframe on a third-party page. Cross-domain iframes can interfere with browser-level tracking.
Q. Can leads be retroactively attributed after I set this up?
A. No. Attribution applies only to leads who complete the quiz after the pixel and identify node are live and published.